
This tutorial will show you how to reset iPad to factory settings by erasing everything on it, this means the entire iPad will be reset and erased, removing all data, apps, photos, movies, and identifying information from the iPad, and reset the iPad to what it was like when it was brand new with nothing on it.

- Open the “Settings” app on the iPad
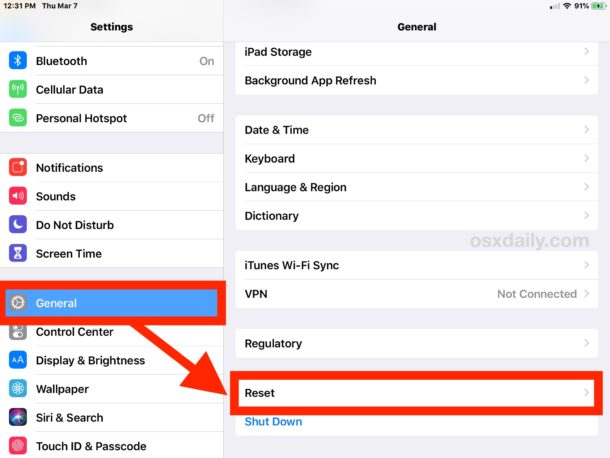
- Go to “General” and then navigate down and tap on “Reset”
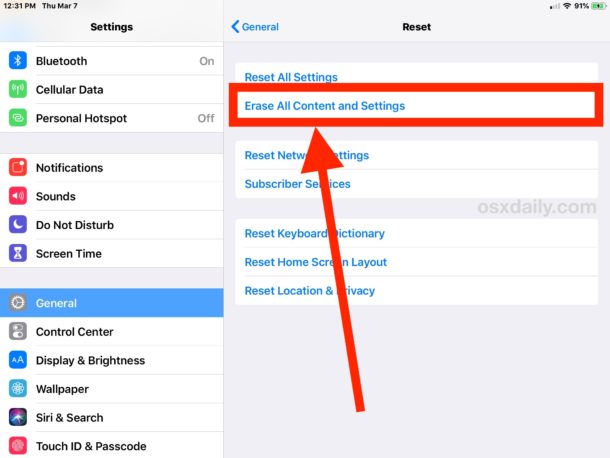
- Tap on “Reset All Content and Settings” to start erasing the iPad
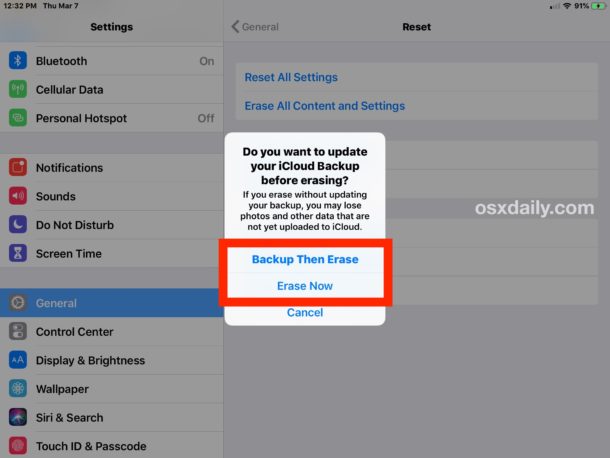
- Choose “Backup Then Erase” to backup iPad to iCloud and then erase, otherwise just tap on “Erase Now” to immediately erase and reset iPad
- Enter the iPad passcode and confirm to reset and erase iPad
The iPad will restart to complete the reset procedure. You will see an Apple logo on the screen with a progress bar.
When the reset completes, the iPad, iPad Mini, or iPad Pro will start up and then start the setup process as if the iPad is brand new. Nothing that was on the iPad before being reset will be available on the device, it will be just like a brand new factory reset iPad.
These iPads should be managed via JAMF (our cloud-based iOS management system.) Here is the process to continue the setup for the next loan.
- When the Hello screen comes up - Swipe up to configure
- Select English language
- Select United State as your country or region
- Click on Set Up Manually
- Choose a Wi-Fi Network - UNION
- Enter SSID Password UNION1795
- Hit Join
- Wait for the Remote Management screen to appear - click Next
iPad will continue to finish configuration
from Course Reserve for the next stepsiPadWhile you wait get another
- Wait for App Installation pop to appear

- Click Sign In
- Click Sign In Use Existing Apple ID
- Apple ID Required Click Settings
- Apple ID - e_classrooms@union.edu
- Password - LecT1795
- Click Sign In

- Two-Step factor authentication will appear
- Go to another iPad

- Click Allow - Apple ID Verification Code will appear

- Enter the code in the iPad
- Go to iPad Settings > iCloud (Electronic Classroom) . Start Using iCloud > Click Not Now (if available).
PAIRING iPAD WITH KEYBOARD
1. Place iPad in the upright typing position. The indicator light will blink, which means the keyboard is ready to pair.
Light isn’t blinking?
Go to iPad Settings > Bluetooth > On. Then press the Bluetooth button located in the top row of your keyboard. Hold for 2 seconds until the status light blinks. The keyboard is discoverable for 2 minutes.
2. Go to Settings > Bluetooth > Devices > Slim Folio Pro.
3. A 6-digit code will appear on your iPad screen. Using the Slim Folio Pro keyboard, type in the numbers.
4. Press the ENTER key. Now you’re ready to type!
Note: If you want to use another iPad with this keyboard case, you will need to go through the pairing process again.