For Windows 
- Open Control Panel and select Programs and Features.
- Select Printix Client and select Uninstall.
If Printix Client was installed with Windows Installer (MSI), then select the Printix Client without Printix logo (smallest size).
- You are asked to confirm the uninstall. Select Yes.
- The uninstall completes. Select OK.
Alternatively you can run unins000.exe in the Printix Client installation folder.
For Mac 
- Open the Printix Client menu.
- Select the Option key to toggle Sign in to Uninstall. On a Windows keyboard the Alt key corresponds to the Option key.
- Select Uninstall.
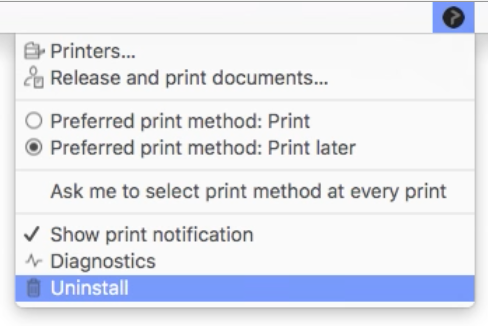
If the Uninstall does not work, it could be because you are not signed in. Select Sign in and then try to Uninstall again. If this fails again, open the Terminal from Applications==>Utilities and type the following:
sudo sh /Users/Shared/.Printix.net/Service/uninstallMac.sh
Type your computer account password (the same one you use to unlock your Mac; you will not see what you are typing) and press Return. The TA icon should disappear from the menu bar indicating Printix has successfully been uninstalled.
On macOS 10.15 or older you should use:
sudo /Users/Shared/.Printix.net/Service/uninstallMac.sh
Printix Client for Mac, Uninstall